AudioLabel LightScribe Label Software
AudioLabel LightScribe Software helps you design and create custom LightScribe disc labels.
It's easy to add images and photos with a simple drag and drop. The software includes a powerful text editor than can align and wrap text on the disc.
Another key feature is the ability to automatically import CD album information and instantly fill out the label.
Once your label design is complete, it only takes a few clicks to transfer the design on a LightScribe CD or DVD.
The
LightScribe template included with AudioLabel works seamlessly with any LightScribe enabled drive.
| AudioLabel LightScribe Label Software - Free Download |
 |
Windows 8, Windows 7, Vista, XP, 2000 |
File Size: 6.88MB |
 |
What is LightScribe?
LightScribe is a simple and efficient way to label your CDs and DVDs. With LightScribe technology, your label design is laser-etched directly
on the disc surface. There is no printer involved, so you get ink free labels that will not smudge, wear off, or peal.
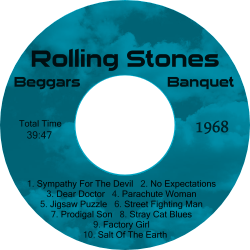
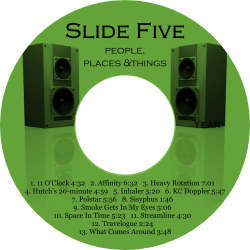
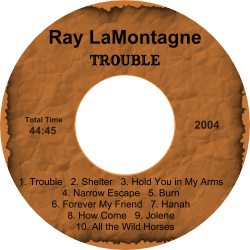
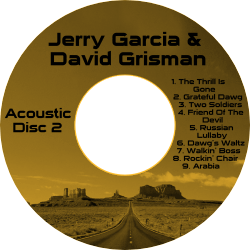
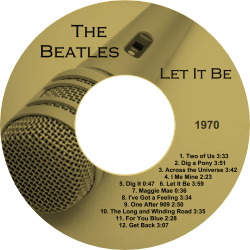
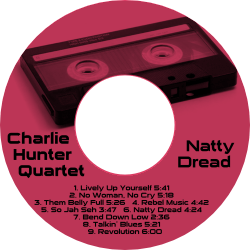
The laser produces a high quality image which appears in gray-scale with a choice of 6 different background colors (shown on the right).
The LightScribe labeling technology was developed by HP (Hewlett Packard) and released in 2004. This groundbreaking technology was the first to produce disc labels
using a laser instead of an ink printer. The same laser that burns a CD and DVD is used to laser-etch a
LightScribe design.
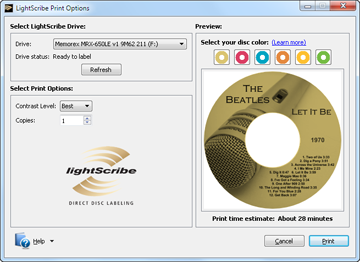
When you're ready to label a disc, simply put the disc in the LightScribe drive (label side down) and run the AudioLabel Labeler software.
What you need to create a LightScribe label:
1. A LightScribe enabled CD/DVD drive - These drives were shipped with most HP desktop and laptop computers, and can also be bought separately
either as an internal or external drive. A LightScribe logo will appear on the outside of the drive or somewhere on your computer as shown below (© 2004 Hewlett Packard).
2. LightScribe CD or DVD media - LightScribe CDs and DVDs have a special coating on the label side that reacts with the laser in your drive. Only LightScribe
discs will work so you cannot use a standard CD-R or DVD-R. The LightScribe discs are available in CD and DVD format and come in 6 different background colors
(gold, blue, green, orange, yellow, and red).
3. LightScribe System Software (LSS) - This is free software from Hewlett Packard and it acts just like a print driver.
Most computers with a LightScribe drive already have this software pre-installed.
If your computer does not have the LightScribe System Software, you can download and install it for free at:
http://www.lightscribe.com/go/downloads/windows
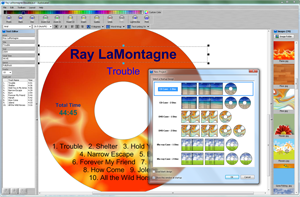
4. Label Design Software - If you need to create a cool design with images and text then AudioLabel
LightScribe Label Software is the best choice. AudioLabel
can automatically find your album information (artist, title, track list) and fill out the label for you. It's easy to add images, photos, and backgrounds that fit perfectly
in the included
LightScribe template. Aside from LightScribe discs, AudioLabel includes templates to print front and back covers for CD, DVD, and Blu-ray cases.
The AudioLabel designer software can be downloaded at:
http://www.audiolabel.com/AudioLabel.exe
AudioLabel LightScribe Dialog
Creating LightScribe labels with AudioLabel:
If you have all the basic components listed above, then you're ready to start labeling. After installing and starting AudioLabel,
you are presented with an easy to use interface. You can add custom text, or use the "Read CD" button to automatically import
your track list. There is also a thumbnail viewer that lets you drag and drop photos or images on the label.
Once your design is finished, click the "LightScribe" button to display the LightScribe dialog (shown on the right).
This dialog shows a preview of your label design and a dotted line where the LightScribe print area is. A LightScribe disc has a
very specific area where the design can be etched, so AudioLabel includes a
LightScribe template that matches this exact print area.
If the LightScribe template has not been previously selected, you can select it here and your text and images will be automatically adjusted
to fit within the template boundary.
After clicking the "Continue" button, the LightScribe Print Options dialog is displayed (as shown below).
This dialog is where you select the LightScribe drive, and the contrast level of the laser-etching. For the highest quality image, it's recommended
that you select "Best" for the contrast level (please note, this will increase the process time). When you're ready to the transfer the design,
place the LightScribe disc in the drive (label side down) and click the "Print" button.
LightScribe Print Options Dialog
For even more contrast, you can run the LightScribe process more than once. As long as you have not changed the AudioLabel design,
the LightScribe printing process will align the image on the disc exactly the same each time. This is possible because LightScribe discs
have special marks on the inner circle which allows the drive to detect the exact rotational position of the disc. For the best
results, please make sure you have the latest LightScribe System Software (LSS) installed on your computer. The latest version has a special feature which
improves the contrast level of the image.
The LightScribe Print Options dialog is separate from the AudioLabel Labeler software, and is controlled by the f (LSS) installed on your computer.
Once the LightScribe printing process has started, it is safe to close AudioLabel (or continue working) without interrupting the printing process.
| AudioLabel LightScribe Designer - Free Download |
 |
Windows 8, Windows 7, Vista, XP, 2000 |
File Size: 6.88MB |
 |